In a previous blog article, I described how to install Riverbed Flow Gateway and NetProfiler on a Proxmox VE (PVE) server. In this article, I will capture the network traffic within the PVE to monitor my different services and applications.
What is NetFlow?
NetFlow is a feature that was introduced on Cisco routers around 1996 that provides the ability to collect IP network traffic as it enters or exits an interface. By analyzing the data provided by NetFlow, a network administrator can determine things such as the source and destination of traffic, class of service, and the causes of congestion.
(NetFlow – Wikipedia)
A NetFlow enabled device (such as Router, Switch, …) logs a flow from both ingress (incoming) and egress (outgoing) IP packets in an interface with 7-key values:
- Source IP address
- Destination IP address
- Source port
- Destination port
- IP protocol
- Ingress interface
- Type of Service (ToS)
These devices are also called Flow Exporter. No only Router and Switches can act as Flow Exporter. There a some software solutions available to capture the data on a server or IoT device.
Flow Collector and Analysis application
The Flow Exporter sends the data to a Flow Collector, and from here an analysis of the flows can be executed. A Flow Collector can receive flows from multiple exporters, therefore a key function of the Flow Collector is to deduplicate the flows. Otherwise, you will see multiple records for one connection.
The Riverbed NetProfiler Flow Gateway is a good example for the Flow Collector. Flow Gateway collects and forwards flow data (NetFlow, sFlow, J-Flow, IPFIX and other popular flow statistics) from network devices and Riverbed AppResponse packet-capture appliances. The Analysis application from Riverbed is called NetProfiler.
Step 1: Proxmox VE as Flow Exporter
If you would like to analyze the network traffic to/from and within our Proxmox VE server, you must configure Proxmox VE as Flow Exporter. Proxmox VE based on a Debian GNU/Linux system, which allows us to install the SoftFlowD package to the server.
Softflowd listens promiscuously on a network interface and semi-statefully tracks network flows. These flows can be reported using NetFlow version 1, 5 or 9 datagrams. Softflowd is fully IPv6 capable: it can track IPv6 flows and export to IPv6 hosts.
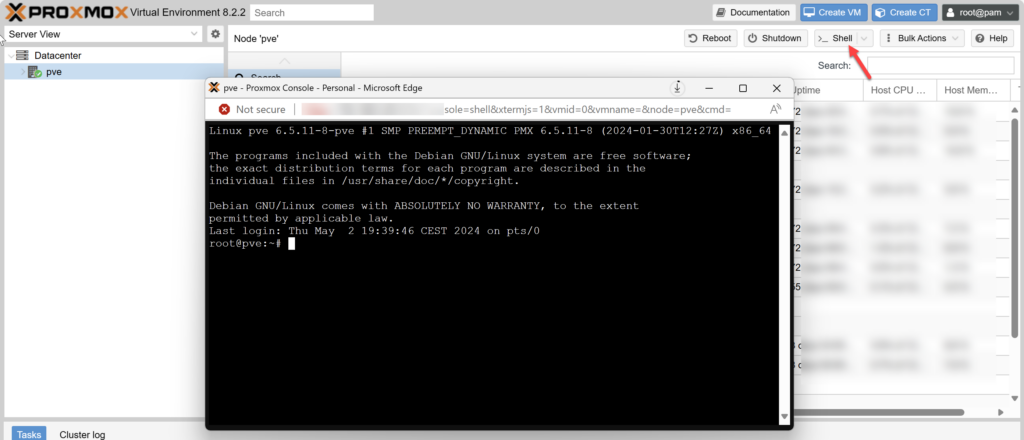
The installation of Softflowd is easy: Please open the SSH shell of the PVE server. This can be done with Putty, the ssh command or the Shell view in your Proxmox Console:
The installation can be done with the apt command:
apt install softflowdStep 2: Configure Softflowd
In the second step, Softflowd must be configured to listen on a specific interface (vmbr0 in the case of PVE) and the flow collector target must be specified. Unfortunately, the standard daemon of the Debian Softflowd package is broken so that we must create our own service to start Softflowd.
The default Softflowd daemon should be disabled and stopped:
systemctl stop softflowd
systemctl disable softflowd
Create a new service file for systemd:
nano /etc/systemd/system/npexport.serviceAdd the following content into this file, but modify the Flow Collector IP (here 192.168.0.11) to your NetProfiler Flow Gateway IP address.
[Unit]
Description=SoftFlowD Service to forward NetFlow data to Riverbed
After=network.target
StartLimitIntervalSec=0

[Service]
Type=simple
Restart=always
RestartSec=1
ExecStart=/usr/sbin/softflowd -n 192.168.0.11:2055 -i vmbr0 -v 9 -d

[Install]
WantedBy=multi-user.target
Save the file with CTRL+X and exit nano.
The Service will execute the Softflowd application with the following parameter:
| -n 192.168.0.11:2025 | Flow Collector IP address and Port. | Please modify this IP address to your NetProfiler Flow Gateway IP. |
| -i vmbr0 | PVE Bridge Interface | (by default, vmbr0) |
| -v 9 | NetFlow Version 9 | |
| -d | Don’t daemonise | Needed to run as service for systemd |
Step 3: Enable and Start Service
Finally, let’s enable and start the new service:
systemctl start npexport
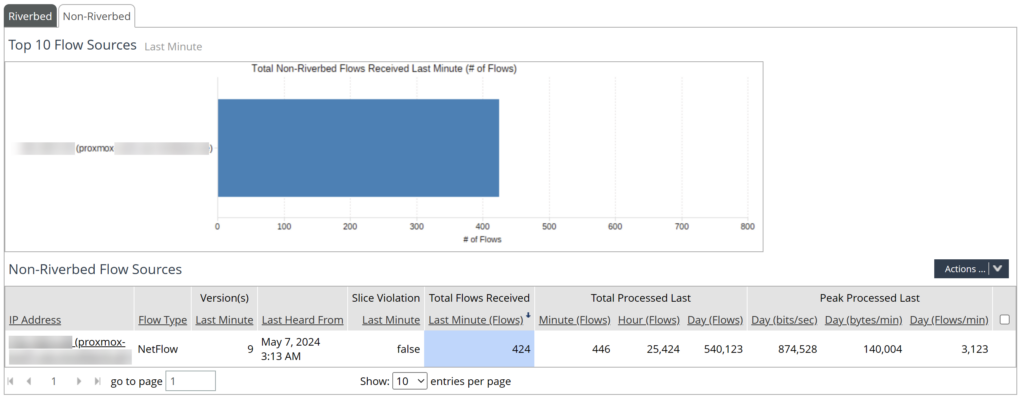
systemctl enable npexportThe NetProfiler Flow Gateway should recognize the incoming flow data. This is visible on the Homepage of Flow Gateway:
Don’t forget to forward the flows to NetProfiler for further analysis. This can be configured at Administration > NetProfiler Export. For more information, please take a look into the NetProfiler Flow Gateway documentation.
Disclaimer: This How-To Guide is written for a non-productive environment, such a test lab. Be careful when implementing this in a production environment. THE GUIDE IS PROVIDED “AS IS”, WITHOUT WARRANTY OF ANY KIND, EXPRESS OR IMPLIED, INCLUDING BUT NOT LIMITED TO THE WARRANTIES OF MERCHANTABILITY, FITNESS FOR A PARTICULAR PURPOSE AND NONINFRINGEMENT. IN NO EVENT SHALL THE AUTHORS OR COPYRIGHT HOLDERS BE LIABLE FOR ANY CLAIM, DAMAGES OR OTHER LIABILITY.